> ## Documentation Index
> Fetch the complete documentation index at: https://anvil.servicetitan.com/llms.txt
> Use this file to discover all available pages before exploring further.

# Segmented Control – Design

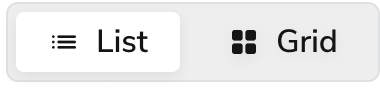
> Segmented Controls switch the presentation view of current or filtered content, such as displaying content in list view vs. a card view.

export const LiveCode = ({children, customHeight, clickToLoad, example, fullWidth, fullHeight, hideCodeInLiveCode, screenshot, screenshotOnly, showCode: showCodeProp}) => {
  const SCREENSHOTS_BASE = "https://servicetitan.github.io/anvil2-docs-live-code/screenshots";
  const STACKBLITZ_BASE = "https://stackblitz.com/github/servicetitan/anvil2-docs-live-code/tree/main/examples";
  const [showCodeBlock, setShowCodeBlock] = useState(showCodeProp ?? false);
  const [isLocalOverride, setIsLocalOverride] = useState(false);
  useEffect(() => {
    const examplePath = `/images/live-code-screenshots-tmp/${example}.png`;
    fetch(examplePath, {
      method: "HEAD"
    }).then(r => {
      if (r.ok) setIsLocalOverride(true);
    }).catch(() => {});
  }, [example]);
  const screenshotBase = isLocalOverride ? "/images/live-code-screenshots-tmp" : SCREENSHOTS_BASE;
  if (screenshotOnly) {
    return <Frame className="flex flex-col">
        <div className="flex dark:hidden" style={{
      justifyContent: "center",
      alignItems: "center",
      width: fullWidth ? "100%" : "50%",
      minHeight: fullHeight ? "284px" : undefined,
      background: "#FFFFFF"
    }}>
          <img srcset={`${screenshotBase}/${example}.png, ${screenshotBase}/${example}-2x.png 2x`} src={`${screenshotBase}/${example}.png`} alt={example} noZoom />
        </div>
        <div className="hidden dark:flex" style={{
      justifyContent: "center",
      alignItems: "center",
      width: fullWidth ? "100%" : "50%",
      minHeight: fullHeight ? "284px" : undefined,
      background: "#141414"
    }}>
          <img srcset={`${screenshotBase}/${example}-dark.png, ${screenshotBase}/${example}-dark-2x.png 2x`} src={`${screenshotBase}/${example}-dark.png`} alt={example} noZoom />
        </div>
      </Frame>;
  }
  if (screenshot) {
    return <Frame className="flex flex-col -mb-2">
        <div className="flex dark:hidden bg-white dark:bg-codeblock border border-gray-950/10 dark:border-white/10 dark:twoslash-dark rounded-2xl overflow-hidden" style={{
      justifyContent: "center",
      alignItems: "center",
      width: fullWidth ? "100%" : "50%",
      minHeight: fullHeight ? "284px" : undefined
    }}>
          <img srcset={`${screenshotBase}/${example}.png, ${screenshotBase}/${example}-2x.png 2x`} src={`${screenshotBase}/${example}.png`} alt={example} noZoom />
        </div>

        <div className="hidden dark:flex bg-white dark:bg-codeblock border border-gray-950/10 dark:border-white/10 dark:twoslash-dark rounded-2xl overflow-hidden" style={{
      background: "#141414",
      justifyContent: "center",
      alignItems: "center",
      width: fullWidth ? "100%" : "50%",
      minHeight: fullHeight ? "284px" : undefined
    }}>
          <img srcset={`${screenshotBase}/${example}-dark.png, ${screenshotBase}/${example}-dark-2x.png 2x`} src={`${screenshotBase}/${example}-dark.png`} alt={example} noZoom />
        </div>

        <div className="flex justify-end items-center text-xs py-2 px-1 gap-4">
          {!showCodeProp ? <button className="inline-flex justify-end items-center text-gray-700 dark:text-gray-50 hover:text-blue-500 dark:hover:text-blue-300 transition-colors group self-end gap-1 cursor-pointer" onClick={() => setShowCodeBlock(!showCodeBlock)} style={{
      appearance: "none"
    }}>
              <Icon icon="code" size="12px" className="group-hover:bg-blue-500 dark:group-hover:bg-blue-300" />
              <span>{showCodeBlock ? "Hide code" : "Show code"}</span>
            </button> : null}

          <a className="inline-flex justify-end items-center hover:text-blue-500 dark:hover:text-blue-300 transition-colors group self-end gap-1" href={`${STACKBLITZ_BASE}/${example}?file=src/App.tsx`} target="_blank" rel="noreferrer">
            <Icon icon="bolt" size="12px" className="group-hover:bg-blue-500 dark:group-hover:bg-blue-300" />
            <span>StackBlitz demo</span>
          </a>
        </div>

        <div className="grid transition-[grid-template-rows] duration-300 ease-in-out overflow-auto overflow-y-hidden overflow-x-auto" style={showCodeBlock ? {
      gridTemplateRows: "1fr"
    } : {
      gridTemplateRows: "0fr"
    }}>
          <div style={{
      minHeight: 0,
      overflowX: "auto",
      overflowY: "hidden",
      marginBlockStart: "-1.25rem",
      marginBlockEnd: "-1.5rem"
    }}>
            {children}
          </div>
        </div>
      </Frame>;
  } else {
    return <div style={{
      display: "flex",
      width: fullWidth ? "100%" : "50%",
      minHeight: customHeight ? customHeight : "316px",
      resize: "vertical",
      overflow: "auto"
    }}>
        <iframe title={example} style={{
      flex: 1,
      width: fullWidth ? "100%" : "50%",
      minHeight: customHeight ? customHeight : "316px"
    }} src={`${STACKBLITZ_BASE}/${example}?embed=1&hideNavigation=1&hideExplorer=1&terminalHeight=0&file=src/App.tsx${clickToLoad ? "&ctl=1" : ""}${hideCodeInLiveCode ? "&view=preview" : ""}`} allow="accelerometer; ambient-light-sensor; camera; encrypted-media; geolocation; gyroscope; hid; microphone; midi; payment; usb; vr; xr-spatial-tracking" sandbox="allow-forms allow-modals allow-popups allow-presentation allow-same-origin allow-scripts" />
      </div>;
  }
};

export const CodePreviewPlaceholder = ({double, fullWidth}) => {
  const single = <div style={{
    width: fullWidth ? "100%" : "50%",
    borderRadius: "1rem",
    display: "flex",
    padding: "1rem",
    flexDirection: "column",
    gap: "0.5rem",
    height: "10rem",
    marginBlockEnd: "1rem"
  }} className="border-width-default border-color-subdued">
      <div className="bg-strong border-radius-large" style={{
    width: "100%",
    flexGrow: "1"
  }} />
      <div className="bg-strong border-radius-large" style={{
    width: "100%",
    flexGrow: "1"
  }} />
    </div>;
  return double ? <div style={{
    display: "flex",
    gap: "1rem"
  }}>
      {single}
      {single}
    </div> : single;
};

<Frame>
  <div className="w-full h-full bg-[#FFFFFF] p-2 rounded flex items-center justify-center">
    <img noZoom src="https://mintcdn.com/servicetitan/H5FwKyiqhPVZ1UJQ/images/docs/web/components/shared/segmented-control-main.png?fit=max&auto=format&n=H5FwKyiqhPVZ1UJQ&q=85&s=ad95de22d0949d53272505735227c1c4" width="380" height="92" data-path="images/docs/web/components/shared/segmented-control-main.png" />
  </div>
</Frame>

## Anatomy

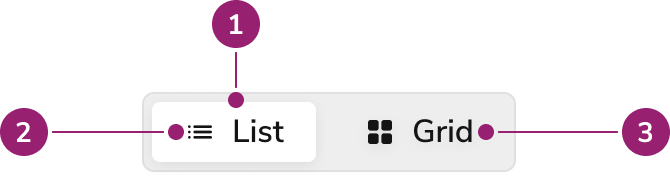
The Segmented Control has three elements that work together to switch the presentation view of current or filtered content.

<Frame>
  <div className="w-full h-full bg-[#FFFFFF] p-2 rounded flex items-center justify-center">
    <img
      src="https://mintcdn.com/servicetitan/Z-EIF5iqj0kJVjT1/images/docs/web/components/segmented-control/design/segmented-control-anatomy.png?fit=max&auto=format&n=Z-EIF5iqj0kJVjT1&q=85&s=a1f137a51380b968f821aa03f615c7b0"
      alt="segmented control
anatomy"
      width="670"
      height="182"
      data-path="images/docs/web/components/segmented-control/design/segmented-control-anatomy.png"
    />
  </div>
</Frame>

1. Selected segment
2. Icon
3. Label

## Options

The Segmented Control supports multiple sizes, fill options, and icon configurations for different use cases.

### Sizes

<LiveCode example="segmentedcontrol-size" screenshot fullWidth>
  ```tsx lines theme={null}
  import { SegmentedControl, Flex } from "@servicetitan/anvil2";

  function App() {
    return (
      <Flex gap="6" direction="column">
        <SegmentedControl defaultSelected="level 1" size="small">
          <SegmentedControl.Segment value="level 1">
            Level 1
          </SegmentedControl.Segment>
          <SegmentedControl.Segment value="level 2">
            Level 2
          </SegmentedControl.Segment>
          <SegmentedControl.Segment value="level 3">
            Level 3
          </SegmentedControl.Segment>
          <SegmentedControl.Segment value="level 4">
            Level 4
          </SegmentedControl.Segment>
        </SegmentedControl>
        <SegmentedControl defaultSelected="level 1" size="medium">
          <SegmentedControl.Segment value="level 1">
            Level 1
          </SegmentedControl.Segment>
          <SegmentedControl.Segment value="level 2">
            Level 2
          </SegmentedControl.Segment>
          <SegmentedControl.Segment value="level 3">
            Level 3
          </SegmentedControl.Segment>
          <SegmentedControl.Segment value="level 4">
            Level 4
          </SegmentedControl.Segment>
        </SegmentedControl>
      </Flex>
    );
  }

  export default App;
  ```
</LiveCode>

### Fill

By default, Segmented Control will hug its content. But it can also fill available width.

<LiveCode example="segmentedcontrol-fill" screenshot fullWidth>
  ```tsx lines theme={null}
  import { SegmentedControl } from "@servicetitan/anvil2";

  function App() {
    return (
      <SegmentedControl defaultSelected="level 1" fill>
        <SegmentedControl.Segment value="level 1">
          Level 1
        </SegmentedControl.Segment>
        <SegmentedControl.Segment value="level 2">
          Level 2
        </SegmentedControl.Segment>
        <SegmentedControl.Segment value="level 3">
          Level 3
        </SegmentedControl.Segment>
        <SegmentedControl.Segment value="level 4">
          Level 4
        </SegmentedControl.Segment>
      </SegmentedControl>
    );
  }

  export default App;
  ```
</LiveCode>

### Icons

<LiveCode example="segmentedcontrol-icon" screenshot fullWidth>
  ```tsx lines theme={null}
  import { SegmentedControl, Flex, Tooltip } from "@servicetitan/anvil2";
  import List from "@servicetitan/anvil2/assets/icons/material/round/list.svg";
  import GridView from "@servicetitan/anvil2/assets/icons/material/round/grid_view.svg";

  function App() {
    return (
      <Flex gap="6" direction="column">
        <SegmentedControl defaultSelected="list">
          <SegmentedControl.Segment value="list" icon={List}>
            List
          </SegmentedControl.Segment>
          <SegmentedControl.Segment value="grid" icon={GridView}>
            Grid
          </SegmentedControl.Segment>
        </SegmentedControl>
        <SegmentedControl defaultSelected="list">
          <Tooltip>
            <Tooltip.Trigger>
              <SegmentedControl.Segment
                value="list"
                icon={List}
                aria-label="List view"
              />
            </Tooltip.Trigger>
            <Tooltip.Content>List</Tooltip.Content>
          </Tooltip>
          <Tooltip>
            <Tooltip.Trigger>
              <SegmentedControl.Segment
                value="grid"
                icon={GridView}
                aria-label="Grid view"
              />
            </Tooltip.Trigger>
            <Tooltip.Content>Grid</Tooltip.Content>
          </Tooltip>
        </SegmentedControl>
      </Flex>
    );
  }

  export default App;
  ```
</LiveCode>

Place icons before the segment's text label, or use them to replace the text label as an icon-only segment.

Use icon-only segments with Tooltip to provide an accessible label.

## Behavior

The Segmented Control responds to user interaction with distinct visual states and selection behaviors.

### Visual States

#### Default

Default segments do not have a focus-visible state because only the selected segment receives focus.

<LiveCode example="segmentedcontrol-data-interactive" screenshot fullWidth>
  ```tsx lines theme={null}
  import { SegmentedControl, Flex } from "@servicetitan/anvil2";

  function App() {
    return (
      <Flex gap="6" direction="column">
        <SegmentedControl defaultSelected="level 1">
          <SegmentedControl.Segment value="level 1">
            Selected
          </SegmentedControl.Segment>
          <SegmentedControl.Segment value="level 2">
            Default
          </SegmentedControl.Segment>
        </SegmentedControl>
        <SegmentedControl defaultSelected="level 1">
          <SegmentedControl.Segment value="level 1">
            Selected
          </SegmentedControl.Segment>
          <SegmentedControl.Segment value="level 2" data-interactive="hover">
            Default Hover
          </SegmentedControl.Segment>
        </SegmentedControl>
        <SegmentedControl defaultSelected="level 1">
          <SegmentedControl.Segment value="level 1">
            Selected
          </SegmentedControl.Segment>
          <SegmentedControl.Segment value="level 2" data-interactive="active">
            Default Active
          </SegmentedControl.Segment>
        </SegmentedControl>
      </Flex>
    );
  }

  export default App;
  ```
</LiveCode>

#### Selected

Selected segments do not have hover or active states because users cannot interact with them when selected.

<LiveCode example="segmentedcontrol-data-interactive-selected" screenshot fullWidth>
  ```tsx lines theme={null}
  import { SegmentedControl, Flex } from "@servicetitan/anvil2";

  function App() {
    return (
      <Flex gap="6" direction="column">
        <SegmentedControl defaultSelected="level 1">
          <SegmentedControl.Segment value="level 1">
            Selected Default{" "}
          </SegmentedControl.Segment>
          <SegmentedControl.Segment value="level 2">
            Other Segment
          </SegmentedControl.Segment>
        </SegmentedControl>
        <SegmentedControl defaultSelected="level 1">
          <SegmentedControl.Segment
            value="level 1"
            data-interactive="focus-visible"
          >
            Selected Focus Visible
          </SegmentedControl.Segment>
          <SegmentedControl.Segment value="level 2">
            Other Segment
          </SegmentedControl.Segment>
        </SegmentedControl>
      </Flex>
    );
  }

  export default App;
  ```
</LiveCode>

* Only one segment remains selected at all times
* At least one segment remains selected at all times

### Focused

Only the selected segment receives focus.

## Usage Guidelines

Use the Segmented Control when switching the presentation view of current or filtered content.

### When to Use

Use Segmented Control for 2-5 selections. Currently it lacks native overflow handling, so test for mobile responsiveness when using this component.

### Alternatives

#### Segmented Control vs Radio

Radios are form controls that users must explicitly submit. Use Segmented Controls for selections that affect the UI immediately.

#### Segmented Control vs Tab

Segmented Control allows users to change the presentation format of displayed content or to filter it. Tabs change the view to show new content.

### How to Use

#### Switching presentation mode

Use Segmented Control to toggle between different presentation modes such as grid vs list.

<LiveCode example="segmentedcontrol-toggle-do" screenshot fullWidth>
  ```tsx lines theme={null}
  import { SegmentedControl, Flex, Grid, Card } from "@servicetitan/anvil2";
  import { useState } from "react";

  function App() {
    const [mode, setMode] = useState("grid");

    return (
      <Flex gap="3" direction="column">
        <SegmentedControl
          fill
          defaultSelected="grid"
          aria-label="Transportations"
          onChange={(value) => setMode(value)}
        >
          <SegmentedControl.Segment value="grid">Grid</SegmentedControl.Segment>
          <SegmentedControl.Segment value="List">List</SegmentedControl.Segment>
        </SegmentedControl>
        <Grid
          gap="3"
          templateColumns={mode === "grid" ? "repeat(3, 1fr)" : "repeat(1, 1fr)"}
        >
          {["Bicycle", "Bus", "Car", "Train", "Motorcycle", "Subway"].map(
            (name, i) => (
              <Card key={i}>{name}</Card>
            ),
          )}
        </Grid>
      </Flex>
    );
  }

  export default App;
  ```
</LiveCode>

#### Filtering content

Use Segmented Control to filter data into segments, providing users with a smaller set of data to engage. Including a number helps indicate how many items are in each filtered segment.

<LiveCode example="segmentedcontrol-filter-do" screenshot fullWidth>
  ```tsx lines theme={null}
  import { SegmentedControl, Flex, Grid, Card } from "@servicetitan/anvil2";
  import { useState } from "react";

  function App() {
    const [filter, setFilter] = useState("all");

    return (
      <Flex gap="3" direction="column">
        <SegmentedControl
          fill
          aria-label="Transportations"
          defaultSelected="all"
          onChange={(value) => setFilter(value)}
        >
          <SegmentedControl.Segment value="all">All</SegmentedControl.Segment>
          <SegmentedControl.Segment value="public">
            Public
          </SegmentedControl.Segment>
          <SegmentedControl.Segment value="personal">
            Personal
          </SegmentedControl.Segment>
        </SegmentedControl>
        <Grid gap="3" templateColumns="repeat(1, 1fr)">
          {filter === "personal"
            ? ["Bicycle", "Car", "Motorcycle"].map((name, i) => (
                <Card key={i}>{name}</Card>
              ))
            : filter === "public"
              ? ["Bus", "Train", "Subway"].map((name, i) => (
                  <Card key={i}>{name}</Card>
                ))
              : ["Bicycle", "Bus", "Car", "Train", "Motorcycle", "Subway"].map(
                  (name, i) => <Card key={i}>{name}</Card>,
                )}
        </Grid>
      </Flex>
    );
  }

  export default App;
  ```
</LiveCode>

#### Sorting content

Use Segmented Control to allow users to sort a list or display by different criteria (e.g., "Newest," "Oldest," "Most Popular," "Alphabetical"). The core content remains the same, but its order changes.

<LiveCode example="segmentedcontrol-sort-do" screenshot fullWidth>
  ```tsx lines theme={null}
  import { SegmentedControl, Flex } from "@servicetitan/anvil2";
  import { useState } from "react";

  function App() {
    const [, setFilter] = useState("all");

    return (
      <Flex gap="3" direction="column">
        <SegmentedControl
          fill
          aria-label="News feed"
          defaultSelected="latest"
          onChange={(value) => setFilter(value)}
        >
          <SegmentedControl.Segment value="latest">
            Latest
          </SegmentedControl.Segment>
          <SegmentedControl.Segment value="trending">
            Trending
          </SegmentedControl.Segment>
          <SegmentedControl.Segment value="saved">Saved</SegmentedControl.Segment>
        </SegmentedControl>
      </Flex>
    );
  }

  export default App;
  ```
</LiveCode>

#### Switching Data Granularity/Time Ranges

Use Segmented Control to toggle between different temporal views of the same data or different interpretations of the same data. Another example includes switching between a percentage (%) or dollar amount (\$).

<LiveCode example="segmentedcontrol-range-do" screenshot fullWidth>
  ```tsx lines theme={null}
  import { SegmentedControl, Flex } from "@servicetitan/anvil2";
  import { useState } from "react";

  function App() {
    const [, setFilter] = useState("all");

    return (
      <Flex gap="3" direction="column">
        <SegmentedControl
          fill
          aria-label="Time Range"
          defaultSelected="day"
          onChange={(value) => setFilter(value)}
        >
          <SegmentedControl.Segment value="day">Day</SegmentedControl.Segment>
          <SegmentedControl.Segment value="week">Week</SegmentedControl.Segment>
          <SegmentedControl.Segment value="month">Month</SegmentedControl.Segment>
          <SegmentedControl.Segment value="year">Year</SegmentedControl.Segment>
        </SegmentedControl>
      </Flex>
    );
  }

  export default App;
  ```
</LiveCode>

#### Toggling Sub-Categories

Use Segmented Control when a section has closely related, but distinct, sub-sections.

<LiveCode example="segmentedcontrol-categories-do" screenshot fullWidth>
  ```tsx lines theme={null}
  import { SegmentedControl, Flex } from "@servicetitan/anvil2";
  import { useState } from "react";

  function App() {
    const [, setFilter] = useState("all");

    return (
      <Flex gap="3" direction="column">
        <SegmentedControl
          fill
          aria-label="Review items"
          defaultSelected="all"
          onChange={(value) => setFilter(value)}
        >
          <SegmentedControl.Segment value="all">All</SegmentedControl.Segment>
          <SegmentedControl.Segment value="on hold">
            On Hold
          </SegmentedControl.Segment>
          <SegmentedControl.Segment value="needs review">
            Needs Review
          </SegmentedControl.Segment>
          <SegmentedControl.Segment value="reviewed">
            Reviewed
          </SegmentedControl.Segment>
        </SegmentedControl>
      </Flex>
    );
  }

  export default App;
  ```
</LiveCode>

#### Selecting an Option in a Form

Use Segmented Control for a small number of mutually exclusive choices within a form. It provides a visually appealing and efficient alternative to traditional radio buttons, especially when space is a concern.

<LiveCode example="segmentedcontrol-radio-do" screenshot fullWidth>
  ```tsx lines theme={null}
  import { SegmentedControl, Flex } from "@servicetitan/anvil2";
  import { useState } from "react";

  function App() {
    const [, setFilter] = useState("all");

    return (
      <Flex gap="3" direction="column">
        <SegmentedControl
          fill
          aria-label="Shirt sizes"
          defaultSelected="small"
          onChange={(value) => setFilter(value)}
        >
          <SegmentedControl.Segment value="small">Small</SegmentedControl.Segment>
          <SegmentedControl.Segment value="medium">
            Medium
          </SegmentedControl.Segment>
          <SegmentedControl.Segment value="large">Large</SegmentedControl.Segment>
        </SegmentedControl>
      </Flex>
    );
  }

  export default App;
  ```
</LiveCode>

## Content

Use labels and icons to clearly communicate each segment option.

## Keyboard Interaction

Users can navigate the Segmented Control using standard keyboard controls.

| Key         | Interaction                                     |
| ----------- | ----------------------------------------------- |
| Arrow Right | While focused, selects the Segment on the right |
| Arrow Left  | While focused, selects the Segment on the left  |

### Accessibility

* Icon-only segments require an accessible name via `aria-label` or `aria-describedby`.

For more guidance on form field labels and context, see [input field context association best practices](/docs/accessibility/labels-and-ctas#input-field-context-association).